Video Overview
Parsing the SOF
Structured parsing logic: Documents are first split line by line, with AI mapping text to predefined Voyager events. An event is defined as 1 entire line (highlighted in green in document preview). An LLM then determines the date and time recorded on each line. If it is legible, it is parsable. But there are some formats to avoid.
use multiple tables or notes unrelated to the events horizontally next to each other
SOFs that have events that span multiple lines
Skewed or rotated PDFs
Once an SOF is parsed, click on the "Validate SOF" button on the portcall or the “SOF parser” (which was “Upload SOF”) to be directed to the SOF parser page.
On the left side of the screen, you will see the file you just uploaded, and on the right side you will see the events that were extracted from the SOF file. At the top right, you can access a simplified port call detail menu. Certain changes, like deleting all cargoes must be done in the main port call menu in the previous page.

When validating an SOF, the first thing to do is filter the relevant events at the top right of the screen and choose the pages with the relevant SOF data for this portcall. This will speed up the process if you have a very long document. Note: use the Voyager defined page numbers in green at the top of the page, not footers from the PDF (in case there is a cover page).

All the events that were, at first glance, successfully extracted from the SOF file will appear as highlighted by green on the file. By hovering with your mouse over the line, you'll be redirected to the event on the right side, like this:
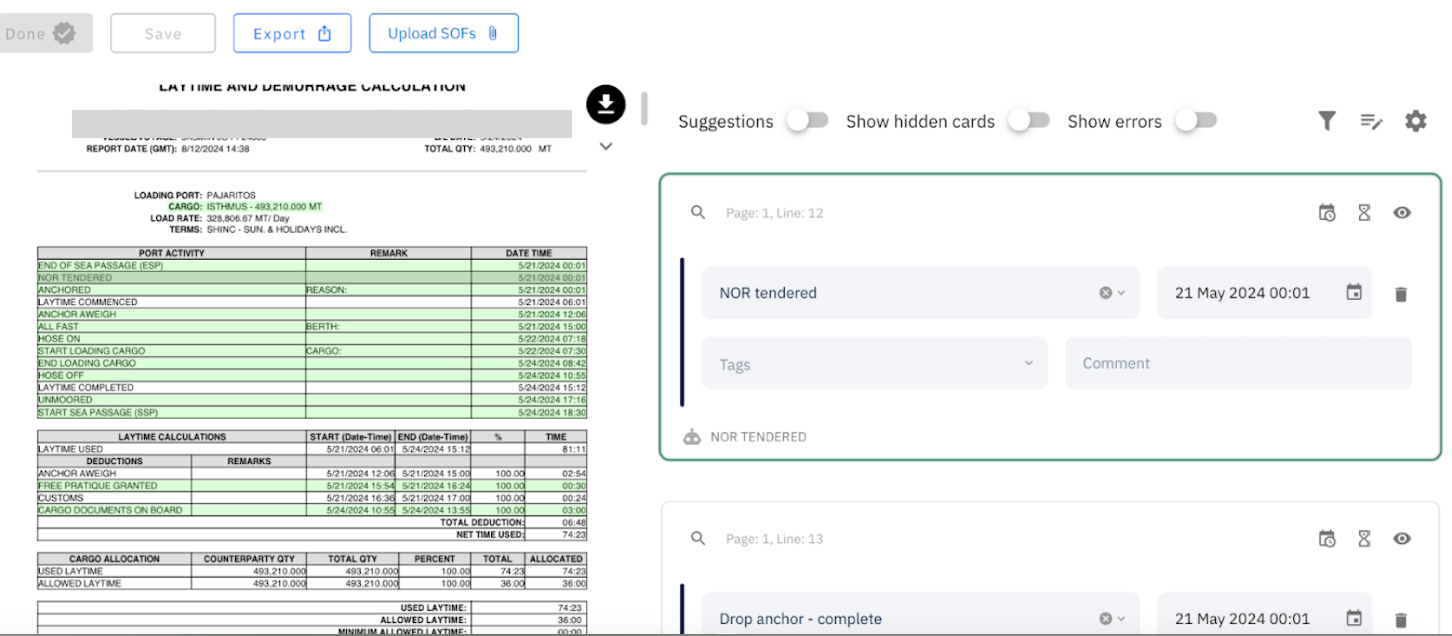
In the event, you'll have:
Event name: This is a select field with Voyager's dictionary of events.
Timestamp: The time in which the event occurred.
Tags: Tags are a helpful way to correlate similar events, or to put them together, for example, with the tags you can tag all events relevant from the same hold. This will appear afterwards in the calculation and can also be used on data analytics with our dashboards.
Comment: Area for comments.
Besides these fields, you will also have these three icons:

Add timestamp event: When clicking on this, it will allow you to insert two entries in the event, one for beginning and one for completion.
Add duration event: This will add an event that considers time intervals "from" and "to", but split into categories such as Vessel Movement and Awaiting/Delay due to certain types of circumstances.
Hide this card: used to hide the event selected.

If you want to undo an event that was detected by the parser and is highlighted in green, all you need to do is to click on the line. You will see that it will stop being green. That means that the event is not being taken into consideration. Or click the eye on the top right of the event card.
If you want to see the card associated with that line of the SOF, simply hover over the line and it will jump to the card. If you want to find the line in the SOF that a card is related to, click the magnifying glass on the card. To share the card directly, click on the page and line number to copy the link.
Show Errors, when enabled, will only show events that the parser was not able to correctly identify. These will be highlighted in red and need to be fixed before you can complete the validation (you may still save the changes, but you cannot press “done”). Dates with yellow boxes are just warnings (usually mean the times were not parsed in chronological order). You can complete validation with warnings.

After you've reviewed all the events, you can click on the "Done" button. You will be redirected to the calculator again. If you have validated the SOF already and you go back into the page, “Done” is not highlighted until you make a change. If you don’t want to make any changes, you can simply press back on your browser or go to a previous page in the menu path on the top left.